hi team biker, its same to use unreal engine 5 ?This post focusses on how to create bike skins. I know some of you will want to do more but it's a good way to get used to the tools and the processes.
Again, Make Sure You Check Out The "Enable Mods" Section From The Previous Post Before Creating Any Mods. Otherwise They Won't Work In Game!!!
Before you do anything, you'll first need to get the tools that you'll be using throughout the tutorial.
Text Tutorial:
You'll need to download 4 things:
These can be downloaded here: https://www.racedepartment.com/downloads/motogp-23-mod-repacking-tools.61858/
Once you have that file downloaded, extract it somewhere that you can easily find as you'll need it later.Next you'll need a program called UE Viewer (formerly known as Umodel): https://www.gildor.org/en/projects/umodel
Similarly to the repacking tools, extract this file to an easy to find place as you'll need to run the program shortly.Next you'll need to install Unreal Engine Editor Version 4.27:

Download Unreal Engine
Follow these steps to download and install Unreal Engine.www.unrealengine.com
That page has a video showing you how to install Unreal Engine, you will want to select version 4.27 from the drop down.The final thing you want to install is Python 2.7:

If you have any other versions of Python already installed, I recommend uninstalling them as it may cause issues later when we come to repack.Now that you've got the tools you'll need from the first part we can get into the modding!!
Text Tutorial:
First of all I'll start by showing you how to edit a bike skin as it's fairly simple, but the process is the same for pretty much any texture in the game so afterwards you can try with something else.
Section 1: Export
- Open Umodel (This will be located where you extracted it earlier).
- Copy and paste the path to MotoGP 23 game directory into the text box (Normally it is: "C:\Program Files (x86)\Steam\steamapps\common\MotoGP™23" ).
- Don't try to navigate to it as it will remove everything after the "™" and you wont see any files, just copy the path directly into the text box.
- Select "Override Game Detection".
- Select "Unreal Engine 4" And "Unreal Engine 4.27".

- Then hit "OK".
This is where it differs from previous years as the game files are now encrypted.
- You'll be presented with a window asking for an AES key, that looks like this:

- Enter this key: 0x0FB0CC53CE764419501BD0BF3A61DC11EF4FA2066C0FD89B3700F32DE13C05DC
- Now click "Ok".
- You'll now have a window with all the directories of the game.
- Navigate to: "Game\assets\graphics\vehicles\bikes\cat001\chassis\chassis101".

If you're unsure of the ID of the bike you want to edit click on textures and then on "livery001.uasset".
This will load the first texture of the bike so you can see if this is the bike you want to edit.
In this case we are using "chassis101", which is the Ducati GP23.
It will display something like this:

If you want to return to the previous screen press "O" and it will exit the preview.
- Once you have found the texture you want to edit, click on "Tools->Export current object" and Umodel will export the texture currently being viewed.
-Umodel will automatically create a folder called "UmodelExport" located where Umodel.exe is. (Again this is where you extracted it to earlier).
You can now find the texture (.tga format) and edit it!
Section 2: Import back in game
Part 1: Prepare your modded textures.
Basically we are now going to convert the modded .tga texture to a .uasset (The file format used in Unreal Engine games).
- Launch the Unreal Engine editor.
- Select Games.

- Select Blank Project.

- Select no starter content, choose a path to save the project to and then you can name it whatever you want. I'm going to call mine "Tutorial".
- Click on Create Project. (Again, create this somewhere you can find later)

- Now that the project is created, you need to create the same directory structure as the texture you extracted through Umodel.
In our case this is:
"Content\assets\graphics\vehicles\bikes\cat001\chassis\chassis101\textures".
To create a folder, Right Click and select "New Folder".
Once it is done, it will look like this:

- Now drag your modded texture here:

- Double Click the texture and change the Texture Group setting to "Project Group 01", this is so the texture doesn't appear blurry in game before loading fully.

- Now you can close the texture window to return to the previous screen.
- Click on File->Save all.
- Click on File->Cook content for windows.
Once this has finished, you can now close Unreal Engine.You're done! Check your mod in game.Part 2: Repack.
In this part of the process, we are taking the files you just cooked and repacking them for the game.
- Now go to the location you saved the Unreal Project earlier.
- From there go to "Saved\Cooked\WindowsNoEditor\ProjectName\Content".
You will see there is a folder called "assets".
- Copy this "assets" folder.
- Next you need to go to the "MotoGP 23 Mod Repacking Tools" folder (This will be wherever you put it earlier).
- From here go to "motogp23\Content".
- Paste the "assets" folder from the previous step.
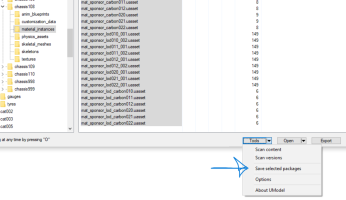
- Now go back to the “MotoGP 23 Mod Repacking Tools” folder and double click "repack command.bat".
Once it's done (it's quick), you will have a file called "pakchunk1-WindowsNoEditor_X_P.pak". Replace the X with something else, like "pakchunk1-WindowsNoEditor_MyMod_P.pak".
- Finally copy the pak file you created and paste into:
"C:\Program Files (x86)\Steam\steamapps\common\MotoGP™23\motogp23\Content\Paks"
(or wherever you have installed the game).
Make sure you copy it to where all the other pak files are!!

MGP23 MotoGP 23 Modding Tutorial
- Thread starter BIKER7202
- Start date


Latest News
-
 Why RaceRoom Is Experimenting With Drift ContentAt an upcoming car tuning event, RaceRoom is holding an in-person final for a sim racing...
- Thomas Harrison-Lord
- Updated:
- 3 min read
-
Multi-class, Pitstops and Fuji Speedway Heading To Rennsport This MonthThe Rennsport Closed Beta is set to expand this time next week, with a 1.8.5 update that...
- Thomas Harrison-Lord
- Updated:
- 2 min read
-
 40 Years Of GP Loop: Nürburgring Shows Interesting Original ProposalsThe Nürburgring is iconic for the Nordschleife, but the GP Loop has been one of Germany's...
- Yannik Haustein
- Updated:
- 3 min read
-
Corsair In Pole Position To Purchase FanatecThe plot thickens, as Corsair signs an agreement to “negotiate exclusively” with the beleaguered...
- Thomas Harrison-Lord
- Updated:
- 3 min read
-
Le Mans Ultimate’s 2024 WEC DLC, Subscriptions and ‘Complementary Services’ PreviewedA free update will add a unique co-op mode to Le Mans Ultimate in June, with possibly a free...
- Thomas Harrison-Lord
- Updated:
- 5 min read
-
F1 24 – Why Supercars Are Out and Anti-Cheat Is Still Work-in-ProgressSay goodbye to Ferrari Romas and Paul Ricard. Say hello to realigned priorities With the...
- Thomas Harrison-Lord
- Updated:
- 3 min read
-
Motorsport Games Revenues Jump 76% Following Le Mans Ultimate Early AccessThe company is still posting losses and is burning cash, but its recent release has stemmed the...
- Thomas Harrison-Lord
- Updated:
- 2 min read